Updated: February 15, 2021
How To Create A Child Theme For WordPress In 5 Minutes Or Less Without An Expert
Table of Contents
So many people overcomplicate the creation of a child theme. It’s a straight-forward and even somewhat simple process. Follow the steps as I explain them, and you’ll have your child theme done, uploaded, and activated in roughly five minutes.

Why You Should Have A Child Theme
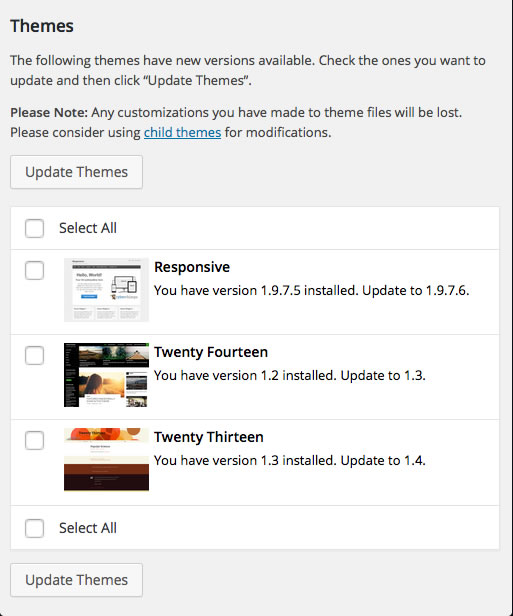
No doubt you’ve seen a similar screen to the one above when you go to your Themes or click to on WordPress Updates. That handy little screen is, in truth, a dire warning. It’s letting you know that without a child theme in place, you could lose any customizations you may have done to your site when the main theme is updated. Meaning, you may lose hours of hard work.
You have a theme that you like, and you spent hours getting it right just. You rebranded it as much as you can to make the overall site appearance your own. Now the look of that theme has become part of your brand identity. You must not risk your brand identity. A properly set up child theme removes all risk.
Each time there’s an update to your theme, all the associated stylesheets and any custom code changes you made are overwritten.
Now, the child theme is linked to the parent theme, meaning it’s dependent on the existence of your parent or main theme.
You simply put all your customizations including your stylesheet that represents your brand identity in your child theme and the next time there’s an update to the parent, you don’t have to worry about it. You can update the parent theme and all your changes are safe.
Let’s Do This!
Why We’re Going to Use A Plugin This Time
As you probably know, here at ServerWise we’re not afraid of commitment… to site speed and optimization. In fact, it rules our lives. It’s our prime directive. We never use a plugin unless necessary because every plugin will slow your site down.
But for this we’re going to make an exception, and I’ll explain why.
I am going to ask you to download and install a plugin. We only need it for about 10-15 minutes. Once we’re done, we’re going to delete it and never speak of it again. Yes, we’re taking a shortcut, but it’s for a good cause – time management and efficiency.

Step 1. Install the plugin and activate it.
First off, we need to install the plugin.
In your WordPress Admin, go to Plugins and Add New.
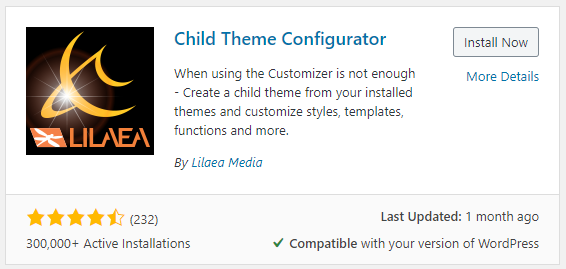
Search for the Child Theme Configurator plugin, which is currently used on over 300,000 sites. Install and activate it.
Step 2. Setting up the plugin correctly.
Now we go to Tools > Child Themes in our WordPress Admin side menu.
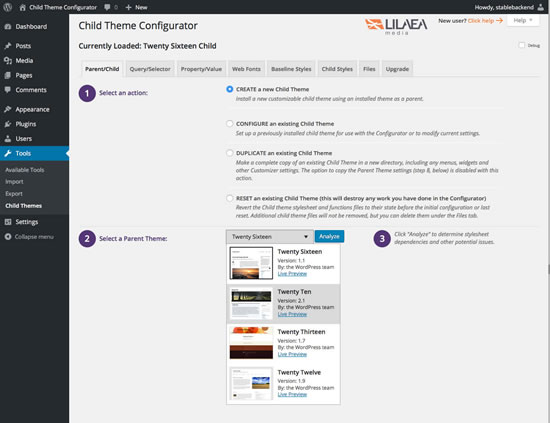
You’ll see the following screen. From this screen you can create a new child theme, configure or even copy an existing one.

In the example above, we’re selecting to create a new child theme from scratch. If you already have a child theme, but you require greater control over it, select Configure An Existing Child Theme.
The plugin author spent a great deal of effort to make Child Theme Customizer easy to use and quite self-explanatory. Although, if you run into issues, they do have extensive documentation on their website.
Step 3. Let the plugin analyze the main theme and name it.
The parent theme is any theme you want to create the child theme from, even if it doesn’t have a pre-existing child theme.
Once you hit the Analyze button, the plugin will go to work. It’s going to scan the main theme (that will become known as the parent theme) and it’s going to pull and list all dependencies from stylesheets, files, etc. You can then choose which ones you want to include in your newly created child theme. Super easy!
At this point, we need to name the new child theme directory. This isn’t the name of the child theme itself (you’ll choose that later). The plugin has to create an entirely new directory in your WordPress Themes folder. I like to keep it simple and stick with Main Theme Child – add the word Child after the name of the parent theme.
Step 4. Select the necessary files, stylesheets and settings.
So we now have our parent theme analyzed. Now it’s time to get down to business and select what files we want to inherit from the parent theme.
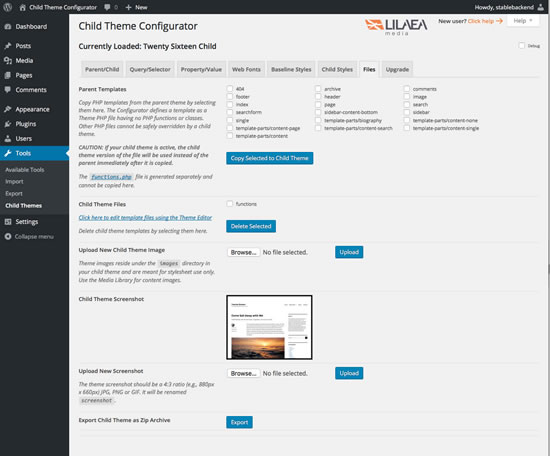
In the Files tab, you’ll see a list with checkboxes of all the files the plugin has found in the parent theme. You’ll also see the stylesheets. Go through and select the boxes of the pages, styles, settings, etc. that you want to include in the new child theme.

Step 5. Copy parent theme menus, customizer settings and special or included widgets.
Do not simply scan over this portion of the child theme creation process.
Many premium WordPress themes include premium (or free) widgets, custom menus (or mega menus) and unique theme customizer settings. Most likely, you want to take all of those with you into your new theme.
Step 6. Run the Configurator!
We’re going to click to run the configurator, which will automatically create our new child theme.
Go to Appearance > Themes, and you’ll see the new child theme waiting to be activated.
But hold up for a minute. Before you click Activate, I strongly suggest you test it out first.
Step 7. Test the new child theme first.
Testing your new child theme before you take it live is easy and doesn’t require anything extra.
We’re going to use the handy Live Preview tool that WordPress includes.
Go to Appearance > Themes.
Click Live Preview below the new Child Theme to see it in action.
Make sure it looks good and functions as expected.
Now it’s time to take it live and click on Activate.
That’s All There Is To It
You’ve just learned how you can easily create, configure and activate your own child theme in less than 5 minutes using a handy WordPress plugin.
At this point, you can go ahead and delete the plugin unless you decide to take advantage of its advanced features.
The Child Theme Configurator is a good plugin that gives you serious control over your child themes. But it’s still one additional plugin that you may not need. Unlike many over things created using a WordPress plugin, removing the tool used to create the child theme will not alter or damage the finished product.
You can safely deactivate and delete the plugin once your new child theme is created.


Everyone who is selling something could use a strong info-product to compliment their brand and boost engagement. Whether you charge for it upfront or not is irrelevant. I’ve put together my 18 step cheat sheet for creating awesome products. Keep Learning >

Divi and Elementor are popular WordPress visual page builder plugins for a reason, but which is best for your needs? Let’s examine the similarities, differences, strengths, weaknesses and pricing to answer that question. Keep Learning >


